Validator Installation
NOTE: This cluster is stopped. There are no active RPC on this cluster to run solana based commands. Switch to `v.01`
How To Setup a Xandeum DevNet Validator
NOTE: This guide shows commands for text editors nano and vim. A quick search can find a guide or video to operate these text editors more efficiently and make your life easier.
1) Installation of the needed binaries.
Start with a fresh instance of Linux as the root user.
These instructions use Ubuntu Server 22.04.2LTS
BEFORE YOU CONTINUE!
Make sure you see your entire drive space as available! Use df -h to see your free space. You want to see that you have all your space in a free partition. Ubuntu will want to default to 100g LVM. The preferance is to eliminate LVM and Raid and use all available space for your / mount point. If you don't show all your disk space, run the Ubuntu installer again and pay attention to the storage section.
Get root user
Run as sudo or root user. If you don't have access to the root user, then you will need to prepend all your requests in this section with sudo.
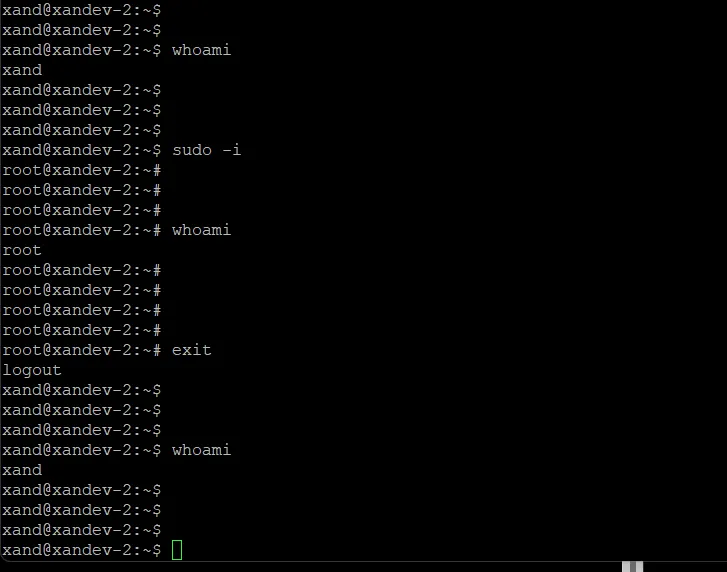
Notice in the screenshot below I start as user xand change to root user then back to xand.
Root user has ALL the privledges and won't require sudo. But some items NEED to be ran as the xand user (ie rust install, validator build, etc)
Use sudo -i to change to root user and exit to end root user
Update your installation
sudo apt-get update -y &&
sudo apt-get upgrade -y
Install prerequestite packages
sudo apt -y install sudo curl git build-essential pkg-config libssl-dev libudev-dev zlib1g-dev llvm clang cmake make libprotobuf-dev protobuf-compiler tmux vnstat - Press OK to restart services if prompted
Enable vnstat to monitor your bandwidth usage on your machine
sudo systemctl enable --now vnstatNote: research vnstat to find many different ways to view information on your bandwidth usage.
Create Xandeum Validator Account
sudo adduser xandEnter a password and accept defaults to the following questions:
New password: Retype new password: passwd: password updated successfully Changing the user information for xand Enter the new value, or press ENTER for the default Full Name []: Room Number []: Work Phone []: Home Phone []: Other []: Is the information correct? [Y/n] y
Add new user to sudo group
sudo usermod -aG sudo xandChange to the Xandeum User account
su xand
Switch the Xand home directory
cd ~
Install Rust, Cargo, and restmft
Run as xand user without sudo privledges.
curl https://sh.rustup.rs -sSf | sh- Take care to select option #1 when prompted to.
Dont forget to set the source for .cargo
source $HOME/.cargo/envAdd rustfm
rustup component add rustfmtrustup updateSet to compile using native cpu flags
export RUSTFLAGS="-O -C target-cpu=native"Special Note:
If you run into issues w/ Rust compiling, or if you receive illegal instruction errors upon starting your validator (usually only if running on a hypervisor), replace the export command with the export below:
- This will generally impact Antsle owners (and some other Virtualization software/hardware) where CPUs will show up as Westmere E56xx/L56xx/X56xx (Nehalem-C)
- Also if your cpu doesn't support AVX2 instruction set you may need this additional RUST Flag. Check if your CPU supports AVX2 using this command: lscpu | grep --color=always -i avx2 and avx2 should show up in red if its supported.
- May serverly limit efficiency of the binaries.
export RUST_REED_SOLOMON_ERASURE_ARCH=native
Clone the Xandeum Repo (Solana for now)
cd ~
git clone https://github.com/solana-labs/solana.git
cd into new repo dir
cd solanaChoose which release you want to compile
git checkout v1.16.10Build (compile) the validator software
./cargo build --release- error: toolchain can be ignored, missing toolchains will be installed.
- To use less processor, try adding jobs limit with -j 2
- This process is going to take some time. Get a beverage, walk the dog, take the kids to the pool. 10-40 minutes typical depending on cpu.
2) After build completes:
Run as xand user in home dir (use cd ~)
Create directories and parent folders -p for the validator files
mkdir ~/.local/share/solana/install/releases/1.16.10/bin -pmkdir ~/.local/share/solana/install/releases/active_release/Move the newly created binary (application files) to the appropriate release folder
cd ~/solana/target/releasemv * .* ~/.local/share/solana/install/releases/1.16.10/binIgnore these errors...as these folders can't move:
mv: cannot move '.' to '/home/xand/.local/share/solana/install/releases/1.16.10/bin/.': Device or resource busy mv: cannot move '..' to '/home/xand/.local/share/solana/install/releases/1.16.10/bin/..': Device or resource busy
Create symlinks (shortcuts) to the directories. This will allow us to change the version that is loaded by creating a symlink to a newer set of binaries
ln -sf /home/xand/.local/share/solana/install/releases/1.16.10/bin/ ~/.local/share/solana/install/releases/active_release/Backup the old $PATH for reference.
echo $PATH >> ~/PATH.bakUsing your favorite editor to open the bashrc config:
vim ~/.bashrcAdd the following lines at the very bottom and save your changes and exit.
export PATH="/home/xand/.local/share/solana/install/releases/active_release/bin:$PATH"
alias l="ls -a --color=auto"
alias ll="ls -alh --color=auto"
alias sv="solana validators --sort skip-rate --reverse"
alias sg="solana gossip"
alias se="solana epoch-info"- Fully exit all shells and come back in.
Check your Install of the software
After logging back in as xand user, time to test if everything worked.
- Check solana version:
cd ~
solana -V- Results should appear simlar to the following

If you are working on a virtual machine, now would be the ideal time to take a snapshot & backup your work just in case you have any issues beyond this point. It is also advisable for bare metal too.
3) Configure your validator instance.
Please observe proper security of your private keys!
Record your 12 words (and bip39 passphrase) in a safe spot. For DevNet it's not critical if you lose them...but if on MainNet, losing the keys equals LOST FUNDS. There is no recovering from lost keys.
- For MainNet, your withdraw authority key should never be on your machine!
Generate your 3 DevNet keys.
- You can leave the bip39 passphrase empty (only applies to DevNet/TesNet since it is not real money).
- Your 12 words and pubkey are shown immediatly after the prompt for bip39 passphrase.
- Take note of the public key it provides you (copy it down). It will help us help you should there be an issue.
Run as xand user!
cd ~solana-keygen new -o ~/validator-keypair.jsonsolana-keygen new -o ~/vote-keypair.jsonsolana-keygen new -o ~/withdraw-keypair.jsonTo view your public key later
solana-keygen pubkey ~/validator-keypair.jsonView your current configuration information
solana config getSwitch to Xandeum cluster
solana config set --url https://api.devnet.xandeum.com:8899Set your new keypair to be used by default.
solana config set --keypair ~/validator-keypair.jsonTesting our work so far.
- Check your connecrtion to the cluster
solana gossip- Request an airdrop from the Xand Faucet
solana airdrop 1 ~/validator-keypair.jsonDo this again 4 more times. (We are also giving you fake XAND/SOL to get started.)
- There is a daily limit per wallet...These tokens on TestNet/DevNet are not real.
Check your wallet balance.
solana balanceYou should have ~5 tokens present if you do it 5x's.
Create your vote account.
- Submit a transaction on the blockchain setting up your vote account
solana create-vote-account ~/vote-keypair.json ~/validator-keypair.json ~/withdraw-keypair.jsonTo find your Vote Account Pubkey later, use:
solana-keygen pubkey ~/vote-keypair.json
4) Configure your Start Script Configuration
Create your validator configuration file using your editor
vim ~/validator-start.sh- There will be nothing in here, so copy and paste in the following configurations. Save and Exit.
#!/bin/bash
exec solana-validator \
        --known-validator HhuygLTeS6grue95pKKzak2UPuQMXepWbvQv2ToQfbZN \
        --known-validator 6vy4sYV6nTLJQ4tBcXUGgPTuGorVh2FJkm6ToVMFSfr2 \
        --known-validator CYQCxRcrSNg2XUiM42tp6bUtbWzZEdmTNawhBg5hSLoo \
        --known-validator 3dZiYo933M7VftTSb7WudJV92cg69QwVYS1s753xRc59 \
        --known-validator 2X8DQyB88vac5yZnkVzz6JxogWzSEhJBfNz7UHbQms1i \
        --known-validator 2Ww2DYCYegUrwxC44funMmdp7Ttyu38jFvUUkrzyyLMw \
        --entrypoint xand-1.devnet.xandeum.com:8000 \
        --entrypoint xand-2.devnet.xandeum.com:8000 \
        --entrypoint xand-3.devnet.xandeum.com:8000 \
        --entrypoint xand-4.devnet.xandeum.com:8000 \
        --expected-shred-version 46090 \
        --expected-genesis-hash 9MJobEeGZJH9KjQNzMcRDuPNFUwJtAnBEEgpWgAgy4VL \
        --snapshot-interval-slots 300 \
        --full-snapshot-interval-slots 3000 \
        --identity ~/validator-keypair.json \
        --vote-account ~/vote-keypair.json \
        --ledger ~/ledger/ \
        --dynamic-port-range 8000-10000 \
        --rpc-port 8899 \
        --log ~/xand-validator.log \
        --limit-ledger-size 50000000 \
#       --expected-bank-hash 3UQBGcNj3s5jfGKVa1jhqyXyPv6anm4PADbZdMCKY3ht \
#       --wait-for-supermajority 610426 \
#       --no-snapshot-fetch \
# --no-genesis-fetch \Note: Every trailing \ is important! Any commented lines # must be at the bottom of the script. This is to save a command that may be needed later but not used now.
Note: Change the location of ledger in the script to your second drive if you aren't using raid0
Here are the known-validators:
Xand1-known-validator HhuygLTeS6grue95pKKzak2UPuQMXepWbvQv2ToQfbZN \ Xand2-known-validator 6vy4sYV6nTLJQ4tBcXUGgPTuGorVh2FJkm6ToVMFSfr2 \ Xand3-known-validator CYQCxRcrSNg2XUiM42tp6bUtbWzZEdmTNawhBg5hSLoo \ Xand4-known-validator 3dZiYo933M7VftTSb7WudJV92cg69QwVYS1s753xRc59 \ t3chie-known-validator 2X8DQyB88vac5yZnkVzz6JxogWzSEhJBfNz7UHbQms1i \ bernie-known-validator 2Ww2DYCYegUrwxC44funMmdp7Ttyu38jFvUUkrzyyLMw \
Make the script you just made executable.
chmod +x ~/validator-start.sh
5) System Tuning
Run as root user, use sudo -i
Optimize sysctl knobs (copy block and paste into teminal, press return)
sudo bash -c "cat >/etc/sysctl.d/21-solana-validator.conf <<EOF
# Increase UDP buffer sizes
net.core.rmem_default = 134217728
net.core.rmem_max = 134217728
net.core.wmem_default = 134217728
net.core.wmem_max = 134217728

# Increase memory mapped files limit
vm.max_map_count = 1000000

# Increase number of allowed open file descriptors
fs.nr_open = 1000000
EOF"
sudo sysctl -p /etc/sysctl.d/21-solana-validator.confOpen the file /etc/systemd/system.conf in your editor
sudo nano /etc/systemd/system.confAdd the following to the [Manager] section. Save and exit.
DefaultLimitNOFILE=1000000Reload the daemon
sudo systemctl daemon-reloadIncrease process file desriptor count limit. (copy block and paste into teminal, press return)
sudo bash -c "cat >/etc/security/limits.d/90-solana-nofiles.conf <<EOF
# Increase process file descriptor count limit
* - nofile 1000000
EOF"
This section is complete. Exit all shells or reboot to activate changes!
Continue on to Setup System Service